4.4 Editing a PIV applicant
The Edit PIV Applicant screen works in the same way as the Edit Person screen does for non-PIV applicants (see section 4.3, Editing a person), but has the following additional tabs:
- STATUS
- POSITION
- SPONSOR
- APPLICATION
- BIOMETRICS
For more information about PIV attributes, see the Editing PIV applicants section in the PIV Integration Guide.
4.4.1 Setting the person's status
On the STATUS tab of the Edit PIV Applicant screen, set the following options:
-
User Data Approved – if the credential profile has the Require user data to be approved option set (which is required for PIV cards) the cards can be issued only to users who have the User Data Approved flag set on their account.
This flag certifies that the applicant has been through the correct enrollment process and has been approved to receive a PIV card.
-
Vetting Date – if you change the User Data Approved option to Yes, then save the person's record, the vetting date is set to the current date. Alternatively, you can set the vetting date manually using the calendar control.
Note: Changing the User Data Approved option to No clears the vetting date.
For more information on the User Data Approved and Vetting Date options, see the Identity checks section in the Administration Guide.
-
Maximum credential expiry date – optionally, specify the latest expiry date for any device issued to this person.
This setting affects all future device requests. It does not affect any issued devices or existing requests.
See section 4.6, Requesting a device for a person for details.
Note: This setting affects device requests made through the MyID Operator Client only. Requests made through MyID Desktop or the Lifecycle API do not take this setting into account. Note, however, that if you specify an explicit expiration date when requesting a device using MyID Desktop, an error appears if that date exceeds the Maximum credential expiry date set for the person. If you do not specify an explicit expiration date, MyID Desktop ignores the Maximum credential expiry date altogether.
You can also set this date using the MaxRequestExpiryDate option in the Lifecycle API. See the Lifecycle API guide for details.
-
NACI Status – records the status of the NACI check.
Note: You must use this only in accordance with FIPS 201-2 guidelines. For PIV-I and CIV, set this to Not Requested.
4.4.2 Providing the person's position details
On the POSITION tab of the Edit PIV Applicant screen, set the following details:
-
Privilege – select the applicant's privileges from the list. This is agency-specific data that can be printed on the card.
-
Affiliation – the cardholder's role or position within the organization; for example, Contractor or Emergency Responder.
-
Agency Association – indicates how the cardholder is associated to the agency; for example, Employee or Contractor. These options are defined by FIPS 201.
-
Department – the department’s name within the agency.
-
Agency – the group name from the Personal tab.
-
Position – the position of the applicant within the agency.
-
Rank – the rank of the applicant.
-
Emergency Role – the specific role in the event of an emergency of the applicant, if any.
-
Additional Information – contains any extra information about the applicant's position.
-
PIV DN – the distinguished name for the user.
4.4.3 Providing the details of the person's sponsor
On the SPONSOR tab of the Edit PIV Applicant screen, set the following details:
- Name – the name of the person sponsoring the applicant.
- Position of sponsor – the position of the sponsor.
- Email of sponsor – the email address of the sponsor.
- Agency of sponsor – the agency to which the sponsor belongs.
- Phone – the phone number of the sponsor.
4.4.4 Providing the person's application documents
On the APPLICATION tab of the Edit PIV Applicant screen, you can provide details of the following documents for the person:
- SF85 or OPM document
- Two identity documents
Note: You cannot scan or upload identity documents using the MyID Operator Client. Use the Lifecycle API, or the Edit PIV Applicant workflow in MyID Desktop instead. The Capture Date is read-only, as this is set when the documents are scanned.
Complete the following details for the person:
- Nationality – select the country of the person's nationality from the drop-down list.
- Country of Birth – select the country where the person was born from the drop-down list.
- Applicant's Place of Birth – select the state, district, or territory (for people born in the United States) or country where the person was born from the drop-down list.
For each identity document, provide the following details:
-
Title – select the document type. Only documents of the types listed are acceptable as proof of identity.
-
Issued by – enter details of the organization that issued the document.
-
Number – the document's serial number.
-
Expiration – the expiration date of the document.
-
The Capture Date is populated automatically when you use the Edit PIV Applicant workflow in MyID Desktop to capture the identity documents – if you import the documents using the Lifecycle API, this date is not captured.
4.4.5 Providing the person's biometrics
On the BIOMETRICS tab of the Edit PIV Applicant screen, you can provide the person's biometric details, including scanning fingerprints and capturing facial biometrics.
Personal details
You can provide the following information about the person:
- Height (ft-in) – type the height of the person in feet and inches; for example, 6' 2".
- Hair Color – select the hair color of the person from the drop-down list.
- Weight (lbs) – type the weight of the person in pounds; for example, 160 lbs.
- Eye Color – select the eye color of the person from the drop-down list.
- Gender – select the gender of the person from the drop-down list.
- Racial origin of cardholder – select the racial origin of the person from the drop-down list.
Signatures
If a signature has been captured for the person, it is displayed on this screen:
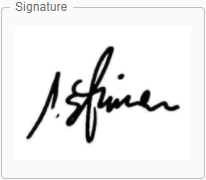
Note: Currently, you cannot capture a signature using the MyID Operator Client. For more information on capturing signatures, see the Signature capture section in the Installation and Configuration Guide.
Iris data
If an iris has been captured for the person, the following indicator is displayed:

If no iris has been captured for the person, the following indicator is displayed instead:

Note: You cannot capture iris data using MyID. To add iris data to a person's record, use the Lifecycle API. For more information, see the PivCardRequest/Agency/Applicant/Biometry/BioSample section in the Lifecycle API guide.
Fingerprints
You can capture fingerprints for the person. If the person has already had fingerprints captured, they are indicated on the Fingerprints control. If the person already has fingerprints captured, you can still capture their fingerprints; any additional fingers are added to their record, and any updated fingerprints replace the fingerprints stored in the database.
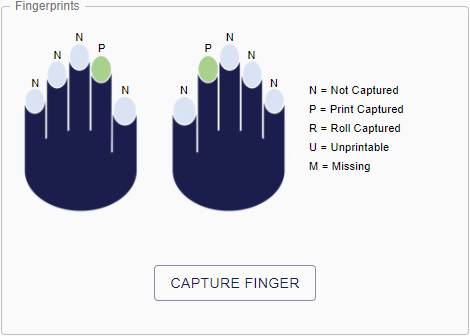
To capture fingerprints:
-
Click CAPTURE FINGER.
The fingerprint dialog appears:

- Select the fingers you want to capture.
-
Click CONFIRM.
The fingerprint capture dialog appears. Follow the on-screen instructions to capture each fingerprint.
Note: The Account for missing fingerprints and Enforce a minimum number of fingerprints during enrollment? options are not enforced when capturing fingerprints using the MyID Operator Client.

Note: Once you have captured the fingerprints, the newly-captured fingerprints are indicated on the capture control on the BIOMETRICS tab; previously-captured fingerprints are not indicated until you exit the Edit PIV Applicant screen and re-enter it.
Facial biometrics
For information on capturing facial biometrics, see section 4.5, Capturing facial biometrics.
4.4.6 Considerations
The Edit PIV Applicant screen in the MyID Operator Client does not work in exactly the same way as the Edit PIV Applicant workflow in MyID Desktop. There are some differences and limitations:
-
Association text is not printed on cards.
This is a known issue. The person's Agency Association code is stored in the database, but the text description is not saved.
-
Changing a person's group does not affect their PIV DN or Department.
If you change a person's group, you must update these fields manually.
-
The person's PIV DN does not change automatically.
If you change the person's name, nickname, or Agency Association, you must update the PIV DN field manually.
-
The Allow duplicate DN does not affect the PIV DN.
-
There is no relationship between fields on the system tab and person's MyID logon name. If there are changes required to keep them synchronized, you must apply this manually. This does not occur where directory synchronization is used.
- The Account for missing fingerprints configuration option is not supported in the MyID Operator Client.
- Unlike in MyID Desktop, you do not need to have the PIV Applicant Editor role to edit PIV attributes in the MyID Operator Client; if your role has access to the Edit PIV Applicant option in the Edit Roles workflow, you can edit PIV attributes.
- The Association and Rank fields are automatically populated with default values in MyID Desktop, but not in the MyID Operator Client.
- You cannot scan identity documents in the MyID Operator Client.
- In MyID Desktop, the PIV Applicant role is added to a person if you use the Edit PIV Applicant workflow to import them from a directory. There is no equivalent process in the MyID Operator Client; instead, you can set the default roles for the group to which you are adding the user to include the PIV Applicant role.
- Changing the NACI Status to Rejected does not carry out any further revocations.
There are some differences in the field names between the MyID Operator Client and MyID Desktop:
|
MyID Desktop |
MyID Operator Client |
|---|---|
|
Security |
Employee ID |
|
Address 1 |
1st line of Address |
|
Address 2 |
2nd line of Address |
|
Association |
Agency Association |
|
Extra Info |
Additional Information |
|
Birth Country |
Country of Birth |
|
Place of Birth |
Applicant's Place of Birth |
|
Race |
Racial origin of cardholder |
|
Iris Captured |
Iris Status |
|
[Sponsor] Position |
Position of sponsor |
|
[Sponsor] Email |
Email of sponsor |
|
[Sponsor] Agency |
Agency of sponsor |